Last night I made dinner. I had BBQ pulled chicken in the crockpot, macaroni and cheese from a box (natch... the kind with a cheese sauce packet, for Nathan, even though I prefer the powdered kind), vinegar & oil coleslaw, and some slices of homemade bread to make sandwiches.
Delicious.
No photos, because I forgot.
Worst post evar? Maybe... but I wanted to keep some sort of rhythm.
14 June 2012
09 June 2012
Halfway there: N's fingerless mittens
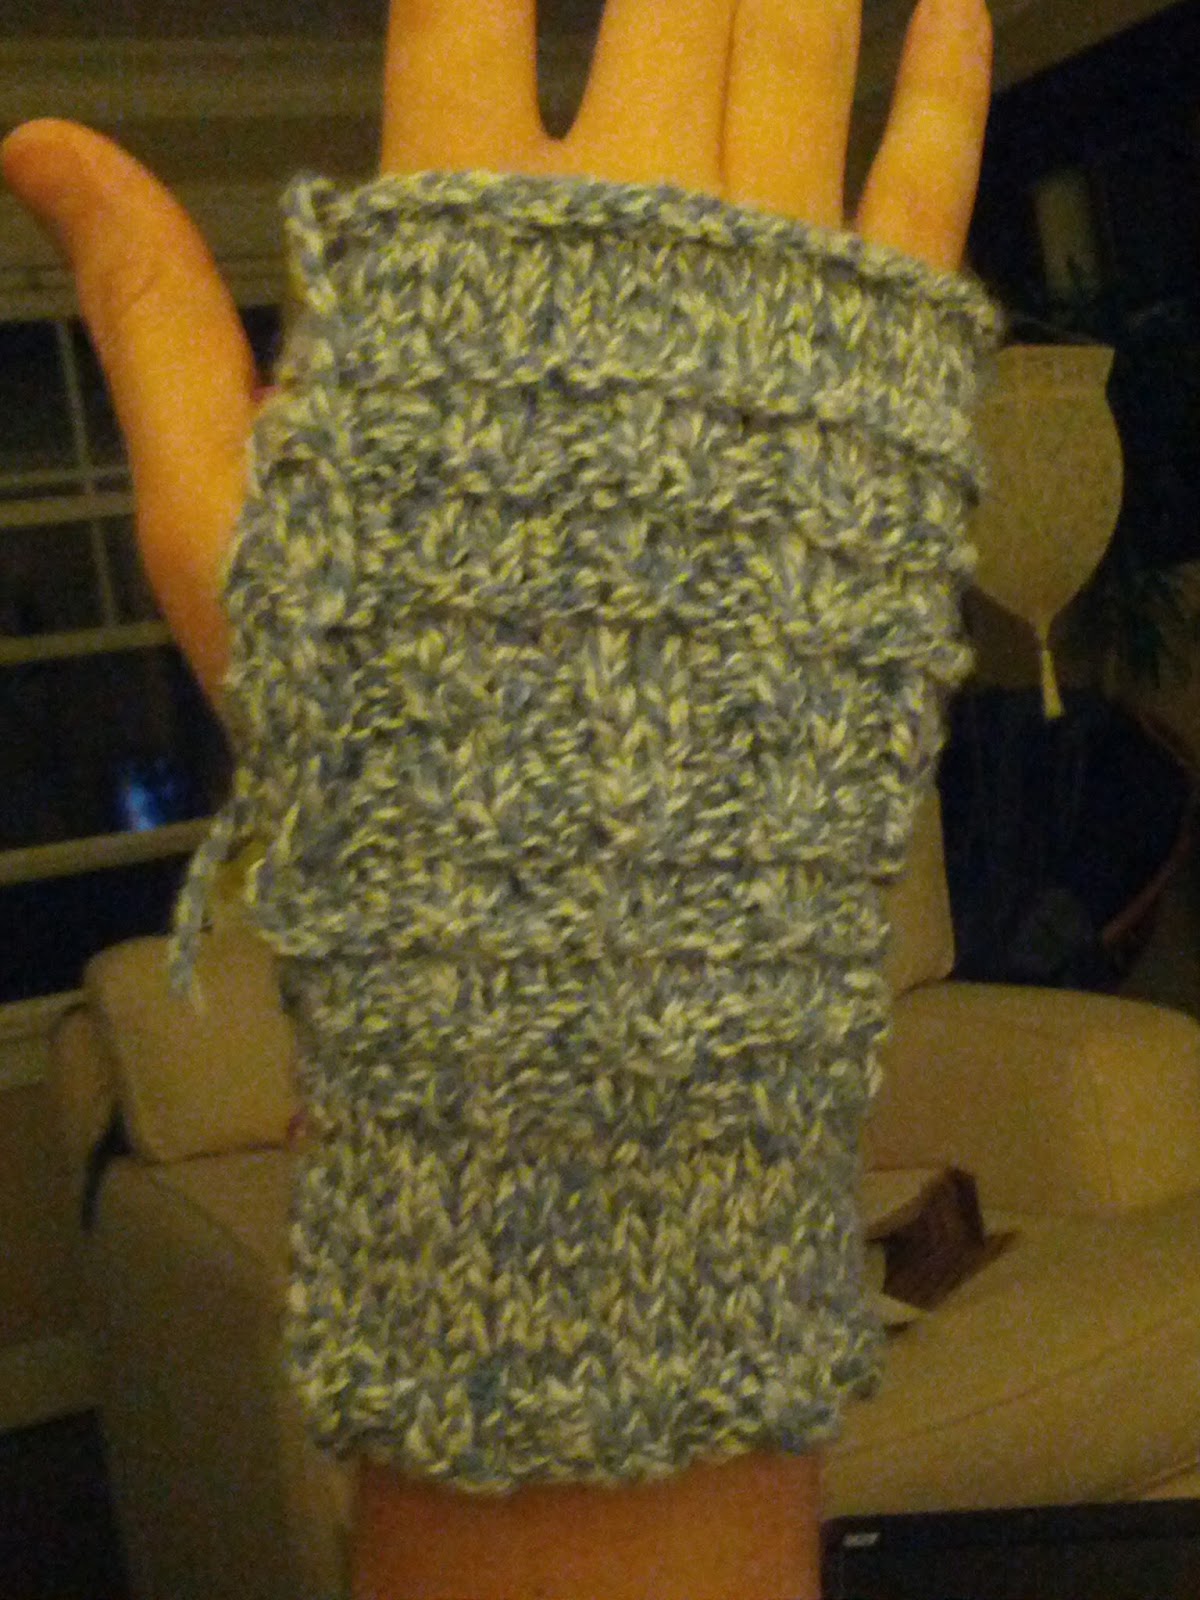
Yesterday I had my only final for the Spring Term. It was online and there were true/false, a few short answer, and some multiple choice. I studied hard and think that I did well, but I'll have to wait and see. In addition to this, I worked on homework assignments and team paper writing and more studying... gah!
After all that work I needed a break! Fortunately, I had my beloved Netflix subscription and a documentary that I've been wanting to see, Word Wars, was available! What does this have to do with anything lovingly handcrafted, you might wonder?
This!
I finished the first of two fingerless mittens for Nathan. Now, this one is just pinned together up the side to check the size so it's not finished.... but I'm so happy and it looks great.
It has a few rows of waffle-y stitch at the bottom with a stockinette cuff, then more waffle for the main hand portion and it it topped with a little stockinette band at the fingers.
I'll wash it, block it, then sew it up the edge leaving room for the thumb and then I'll get to start a new one. The big question: should I cast on the 2nd piece now... or wait until I make my momma a dishcloth in blue?
Decisions, decisions.
After all that work I needed a break! Fortunately, I had my beloved Netflix subscription and a documentary that I've been wanting to see, Word Wars, was available! What does this have to do with anything lovingly handcrafted, you might wonder?
 |
| A fingerless mitten! Pinned up the side for testing. |
This!
I finished the first of two fingerless mittens for Nathan. Now, this one is just pinned together up the side to check the size so it's not finished.... but I'm so happy and it looks great.
It has a few rows of waffle-y stitch at the bottom with a stockinette cuff, then more waffle for the main hand portion and it it topped with a little stockinette band at the fingers.
I'll wash it, block it, then sew it up the edge leaving room for the thumb and then I'll get to start a new one. The big question: should I cast on the 2nd piece now... or wait until I make my momma a dishcloth in blue?
Decisions, decisions.
06 June 2012
Sewing: Sweet Handkerchief
It is finally here! My new sewing machine that can both wind bobbins and sew without tangling!
It also has decorative stitching and a needle threader. Fancy!
Then I pushed the pedal to the metal, so to speak, and zipped along. After cutting close to the scallop edge and removing extra fabric...
Ta da! Handkerchief!
It also has decorative stitching and a needle threader. Fancy!
 |
| So many stitches |
I decided to test it out by using the satin scallop edge to hem a hanky.
I had some old cotton fabric from a lovely quilt I made my mom a bajillion years ago.  |
| Scallop edge, plus trimming |
 |
| The finished pieces, folded oh-so-nicely! |
Ta da! Handkerchief!
05 June 2012
Cast on: Fingerless gloves/handwarmers
So, after finishing my dishcloth I was eager to start something new. I owed my mom a dishcloth, but I was waiting to hear what color she wanted to match the kitchen, so I wanted to wait. I also want to make a lovely shawl or sweater or something but since mom is sending me some of my Oma's old needles, I wanted to wait and see what sizes I get (and maybe circular?) And I didn't want to buy anything.
Fortunately, I had a bunch of yarn that was gifted to me from a friend when she moved out of the Cleveland area that has just been sitting in a cabinet, not being used. I pulled out some Bernat Denim Style (cotton, acrylic blend) and searched ravelry for a beginning pattern that's knit on straight, size 7 needles that won't use too much yarn (I only have 1 skein). Ta da! Knit flat and then sewed up later, I have a simple, free pattern to start on a set of hand warmers for Nathan.
I am doing okay, but a few kinks:
- This called to cast-on 36 stitches, but since Nathan has Man Hands I added an extra 4. I'm sort of concerned that this will be too big and it won't have enough stretchy part to fit. I think if this is the case, I'll just sew these up with an overlap and maybe add some decorative-type buttons.
- For the waffle stitch, I have to knit 2, purl 2 over and over along the same row. I am a little confused since the working yarn ends up on the wrong side when I switch from knit to purl (and vice versa)... but I've just been bringing the yarn over to the other side under my needles. I guess it looks ok? But I don't know if this is right.
- I don't know if I'll want to make a second one after I finish the first. Always a threat with me. :)
I'm really happy with how it looks so far. I have nice little "V"s on the front and cute little dashes on the back... and my waffle stitch at the bottom is so waffle-y!
Yay!
 |
| Nathan's hand warmers. Look! Waffle stitch on the right! |
Fortunately, I had a bunch of yarn that was gifted to me from a friend when she moved out of the Cleveland area that has just been sitting in a cabinet, not being used. I pulled out some Bernat Denim Style (cotton, acrylic blend) and searched ravelry for a beginning pattern that's knit on straight, size 7 needles that won't use too much yarn (I only have 1 skein). Ta da! Knit flat and then sewed up later, I have a simple, free pattern to start on a set of hand warmers for Nathan.
I am doing okay, but a few kinks:
- This called to cast-on 36 stitches, but since Nathan has Man Hands I added an extra 4. I'm sort of concerned that this will be too big and it won't have enough stretchy part to fit. I think if this is the case, I'll just sew these up with an overlap and maybe add some decorative-type buttons.
- For the waffle stitch, I have to knit 2, purl 2 over and over along the same row. I am a little confused since the working yarn ends up on the wrong side when I switch from knit to purl (and vice versa)... but I've just been bringing the yarn over to the other side under my needles. I guess it looks ok? But I don't know if this is right.
- I don't know if I'll want to make a second one after I finish the first. Always a threat with me. :)
I'm really happy with how it looks so far. I have nice little "V"s on the front and cute little dashes on the back... and my waffle stitch at the bottom is so waffle-y!
Yay!
04 June 2012
Ballband Dishcloth: Finished!!
And.... done!
I finished my first knitted dishcloth yesterday afternoon right down to casting off and tucking the ends of yarn back into the piece. This pic is sort of awful, and the dishcloth is wet because I'm trying to 'block' it so that the edges are straight.

But! In person it's beautiful.*
*Ok, ok... so about halfway through I must have missed a row and then my frontside vs. backside pattern switched and I didn't notice until 3 rows later and I would have taken that out and backed up, but I didn't really feel confident that I'd be able to actually back up three rows without losing loops and messing the whole thing up. Note to self: find some way of counting rows.
03 June 2012
Thai Sticky Rice
Last summer, Nathan and I took a 2-week trip to Thailand to help our dear friends celebrate their wedding. We walked all over and tried new foods and ordered by pointing at market vendors. We ate fried chicken with sweet chili sauce, crispy cucumber slices and sticky rice.
I was really concerned at first that the rice was going to fall all the way through the holes and into the water boiling below. Now that I've made this twice, the fear is completely gone. I haven't had a single grain fall through. Soaking helps the rice sort of stick together (like wet sand).
Once the timer goes off, the rice needs to be turned over. I've used a non-stick silicon spatula in the past with great success. This time, I used a wooden spoon and a metal spatula to just lift under the clump of rice and flip it like a pancake. You won't be able to get all of it flipped perfectly but... well, whatever. Do your best.
Once the rice is flipped, put the lid back on and set the timer for another 10 minutes. You'll want to make sure that that you don't run out of water in your steamer.
When the timer goes off, you're done! Rice is best pushed into a mold to make a shape, or served with steamed bok choy and sous vide pork belly.
Ok, these instructions made it seem really complicated. Here's a summary:
 |
| Thai Glutinous Rice |
Last night I cooked up some thai sticky rice to go with some sous vide pork belly that Nathan left for me. Here's how it goes: Start with thai glutenous rice. You will see it called "Sweet Rice", but honestly I have no idea why. It doesn't taste sweet. You can get this at an Asian market for about the same price as any other rice, and I think we picked ours up at Park to Shop in Cleveland's asiatown, but any market will do. (It might be hard to find this at a mainstream grocery, I've seen some Japanese short-grain sticky rice for sushi, etc., but this is different.
 |
| Rice drained after soaking |
Next you want to wash the rice. Add some rice to a bowl with cold water, swish it around with your hands until the water is cloudy, and carefully pour the water out. Do this 3 times. Finish by adding plenty of cool water to the bowl and set a timer for 45-60 minutes to let your rice soak. After the hour of soaking, carefully pour out the water. This rice looks sort of chalky-white-opaque, rather than an almost translucent cream color of other rices.
Set up a steamer basket on the stove over boiling water. There are more traditional bamboo steamer baskets available at different asian markets that sit over a pot of boiling water and can be used for rice or steamed dumplings, but to be honest I've never actually used one. For our purposes, a metal steamer that fits in a pot works just fine. (I've also read a technique where a splatter screen is set over the top of a frying pan with boiling water, then a metal bowl set upside down on the screen for steaming.) Really, any old thing will do.
 |
| Soaked rice spread in the steamer |
Once the water for the steamer is boiling, dump the rice into the steamer and spread it into an even level and put a lid on, set a timer for 15 minutes.
I was really concerned at first that the rice was going to fall all the way through the holes and into the water boiling below. Now that I've made this twice, the fear is completely gone. I haven't had a single grain fall through. Soaking helps the rice sort of stick together (like wet sand).
 |
| Flipping the rice |
Once the rice is flipped, put the lid back on and set the timer for another 10 minutes. You'll want to make sure that that you don't run out of water in your steamer.
When the timer goes off, you're done! Rice is best pushed into a mold to make a shape, or served with steamed bok choy and sous vide pork belly.
 | ||||||
| My dinner is served! |
1. Rinse the rice in cool water two or three times
2. Soak the rice in cool water for an hour
3. Put the rice in a steamer for 15 minutes
4. Flip the rice over
5. Steam for 10 more minutes
6. Eat it with pork belly and bok choy
02 June 2012
A few rows of ballband
So it has happened! I have knitted 12 rows and I am not even angry or frustrated. My pattern for this ballband dishcloth includes knit, purl, slips, and yf and yb (yarn forward and backwards, respectively).
It was supposed to be in two colors (and addition to this buttery yellow I have a dusty blue), but after watching all of those youtube videos I don't really want to watch anymore to learn how to work another color in. This yellow was a gift from a RAK that showed up a couple of days ago. Anyway, multiple colors will have to come with cloth #2. I wonder if I can finish by the time Nathan gets home?
 |
| 12 rows of a dishcloth! |
 |
| Detail of the pattern, this will repeat until the end. |
Subscribe to:
Posts (Atom)